Glidecam V-20 Montreal Video Shoot
New to the industry? Are you making an indie film? Want to make it look epic and increase production value? Well I’ve got some good news for you! Here are my personal tricks on how to achieve these effects at minimal or no costs as long as you have some time.
As an independent filmmaker producing and directing short films over the past years; including Hope; I have found that it has been a challenge to get indie films up to par with large budget productions. I think the following tips are the most effective for increasing production value in your next film project. (See below for our short film, starring Mindy Eklove & Chris Public where I’ve used some of the tips mentioned).
1. Use Purchased Royalty Free Footage – In my most recent film, the story needed a few actors in swat team costumes which would cost approximately $200 to rent per piece. We needed about 6 actors in the shot that would last for only a few seconds. Our indie film had no budget for that. The solution was to find military footage where a bunch of men were storming a room. It wasn’t difficult to find on Pond5. The shot actually matched our scene perfectly. Another tip is that it may be easier to review royalty free footage in advance. This way you can choose your shots more wisely during filming to match your royalty free footage better.
Photograph from desktop wall papers
Sometimes, you can even manipulate your royalty free footage. I was cutting a trailer recently for this project and I used 2 pieces of royalty free footage. One was a news reel clip, the other was a shot in a living room with the television playing in the foreground. I needed the TV screen to play my royalty free footage. Therefore I used Adobe After Effects and composited the TV footage on top of the living room footage. You can also use another popular compositing software called Nuke by The Foundry.
2. Customizing Royalty Free Music – Laying out a piece of royalty free music onto the timeline without doing any editing on it will make your film sound low budget and amateur. It’s really essential to make sure that your music matches your work. There are several ways to do this as I’ve discussed in my last blog entry on music editing.
First, you can use the “Beat Match” technique, where an editor will cut the music to shorten or to increase its length by duplicating the clip and laying the “down beat” on top of one another to hide the transition in the music. The next one, I call “Camouflaging the Soundtrack”. It is used when the editor cannot find an appropriate transition point in the music, the editor will cut the track and cross fade it over a voice clip or a series of sound clips. The editor can also add extra sounds to bump up the complexity of the score, or by trimming certain video frames to better match the music.
Sony Vegas timeline
Anyway, customize your royalty free music the best you can, it will make it seem as if your score was custom composed for your project!
3. Using Digital Set Extensions – I find this to be the most bang for your buck. This technique is used to replace an existing background with a digitally manipulated one. An effects editor may also add extra assets to make the shot more believable such as smoke, distant animals etc. In general, the footage will be tracked first. The tracking data will then be used for the composite so that the footage will “stick”. An artist will create a matte painting of the background needed to be replaced. The painting will be super imposed onto the original footage. By doing this there are maybe parts of the footage that may be overlapping by objects such as the actors, cars etc. Those objects need to be masked (removal of the matte painting in areas where objects overlap). Animating a mask is also known as rotoscoping. This technique is very time consuming but will increase production value greatly.
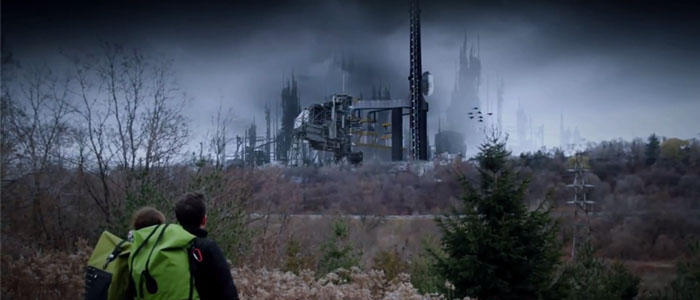
In Hope, the actors were overlooking a valley. I’ve painted out the real background filmed using Adobe Photoshop, and created our own using a series of photographs and stitching them together. I’ve added several assets (smoke, distant birds, lighting), colour corrected the shot, and tracked it into the footage so that it matched the shot. Our project took some time to complete because some parts of the shot had to be manually hand tracked to the camera movement as the software didn’t pick it up.
You can learn more about set extensions by checking out Andrew Kramer’s free set extension tutorial.
4. Using Miniatures and 3D Models – I’ve used both miniatures and 3D computer models in my projects in the past. In one project, back in the day where Blender wasn’t available, I purchased a model helicopter and hung it using wires. We then filmed it outside in front of a green screen then composited into the shot in post using After Effects. We had to recreate the rotor blades in the software and colour corrected it using Sony Vegas to match it into the shot. The film was called Blood Water and it was well received in festivals as the effect made it look more epic.
When 3D models became more commonly used in indie films, we downloaded a 3D model of a jet for free at Turbo Squid for Hope. I then used After Effects to composite it into the shot. 3D models are really complicated for a video editor with no formal computer animation education. I personally prefer to use physical purchased models where I will camera match the model by moving it manually by hand and using the “time re-mapping” tool in After Effects to adjust the timing more accurately to match the scene appropriately. However, if you’re into film animation, you get more control of the shot using computer models. Some popular software’s are Maya 3D Studio Max, Lightwave and of course the open source Blender.
In Conclusion
So there you have it, 4 different ways to increase production value in your next film project. Some directors will use some or all of the techniques mentioned above. There are also many other ways to increase value that you can experiment with as well. This includes exploring the green screen realm where one can create various scenes by using just one location (like in the film 300 by Zach Snyder filmed in Montreal, Canada), to making a city look like it was in destruction like this tutorial here by Kramer. Don’t forget to check out our film below, and follow us on Twitter! Like always, happy editing!