During our winter holiday, we had a chance to ride on I’d say the best downhill trails in Ontario. We’ve used a GoPro camera to capture the footage, we’re not pro snowboarders so we ended up mixing royalty free footage to make the edit more entertaining and epic! Here are the 5 tips on how you can use royalty free footage and music to add to your video’s creatively!
#1) IT’S THE SOUND OF MUSIC – Finding music is one of the most important things in a GoPro video because GoPro cameras do not capture sound well. You will definitely need a separate audio capturing device or add music to it in post production, that was what we did. I found that the best free music can be downloaded at Ben Sound, Josh Woodward, and Global Sound Promotion. Youtube also offers royalty free music, you can also check out Jamendo and Incompetech.
Once you have selected the music, you will need to adjust it according to the length of your video clip. In our project, we’ve trimmed the music down to custom fit the length. When you’re editing royalty free music, you would need to cut the music on the beat otherwise the transition will be heard. If you have sound effects or other audio tracks, you maybe able to use those sounds to hide your transitions points.
You can read how to edit royalty free music in more depth from my previous post. Also check out the section about music in the article: “how to add more value to your film”
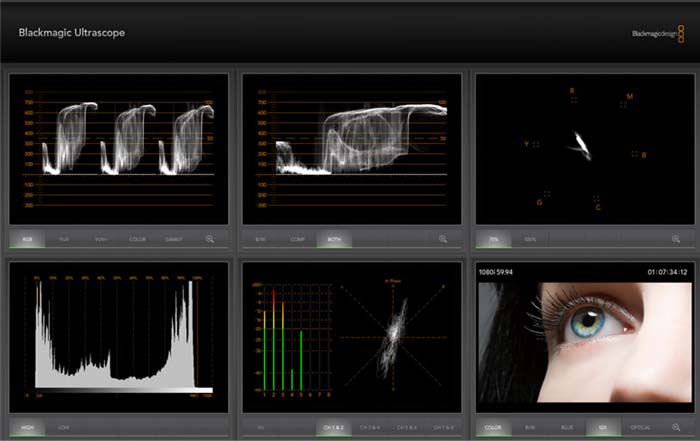
 FIG 1. Use video scopes help determine broadcast legal colours & levels.
#2) CREATING THE STORY – When you’re creating your video, you’ll need to tell a story. If you only record the actual event during the filming process, it will make the video stale as there will be no lead or end. Instead film the events that took place, before and after so that during the editing, you can build a story for your audiences. You can even add interviews or voice overs discussing about your thoughts.
For example, in the first shot of our snowboarding video, we had a shot of the sun rising from the start of the clip to signify the morning. Next, we revealed a man walking out from the house followed by a series of cuts filmed from a car window which indicated to the audience that the group is travelling towards the mountain range. The clip unfolds with shots from the ski lifts and finally of people snowboarding down the mountain. The final shot was a royalty free clip of an epic jump to signal the ending of the video.
By having a simple short story, the audience can meet the characters, and become more easily intrigued by them. The better the video connects and relates to people the more success it will have.

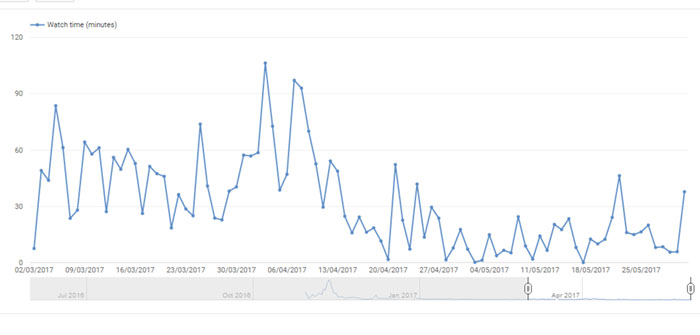
FIG 2. Short horror film audience retention data.
#3) AUDIENCE RETENTION DATA – Once the story is roughed in, it is necessary to create an entertaining artistic cut otherwise you’ll loose the audience. One of the ways is to match the cut of the video to the beat of the music. Unfortunately nowadays, many people have short attention spans. Audiences will only put in a few minutes, even seconds of time to watch a video before skipping away as you can see in my Youtube analytics data for our new short web series – Forgotten Corpses.
In the data (FIG. 2) many people stopped watching our film at just under 50% of the way. While analyzing the content of our film, it took some time to establish the scene and it developed slowly. Thus I believe it wasn’t captivating and engaging enough at the start for the audiences to continue watching it. With this information we were able to fix the issue for our next webisodes.
So if you want people to watch your material, make it worth their time as media today is becoming more saturated.
#4) COLOUR CORRECTION – Many people get confused between the term colour correction and colour grading (Fig 1). Colour correction is to adjust the colours in a video clip so that they are broadcast legal. That means that they are not over or under saturated, and clips are neither over or under exposed. Colour grading is the artistic portion of the procedure. It is done by shifting your scene towards a certain portion of the colour spectrum to help convey an emotional feeling for the audiences when watching the clip.
For example, if you have a scene that takes place in the winter, you might want to shift your colours towards the blue spectrum as most of the colours during this time of the year are “cooler”. Alternatively, you may want to shift your colours towards the yellow and red spectrum if your scene calls for a warm environment.
Colour correcting is useful when using royalty free footage because most of the footage will not match your master shot. Therefore to make it look as if it was recorded with the same camera and have consistency throughout, it’s important to match all the colours for each clip, this was what help sell the footage in our video above.

#5) AUDIENCE TESTING – After editing for several days, your mind becomes numb. It’s important to get feedback from people that were not involved in the project. Before an important film is released, production companies arrange test screenings before the general public sees it. They will use the information obtained and adjust the film accordingly in order to ensure a successful launch.
So there you have it, 4 tips to successfully edit royalty free footage. If you have any questions regarding video editing or production feel free to contact us. And like always, happy editing!
