TABLE OF CONTENTS:
1) Introduction
2) Why We Clean Our Heads
3) Tape Inspection
4) Technical Processing
5) Why Our Footage Looks “Flat”?
6) Conclusion
If you’ve stumbled upon old home videos hidden in a closet, maybe family VHS tapes from the ’90s, 8mm home movies, or Betamax recordings and are curious about digitizing them, the thought of those clips being upgraded to 4K quality might have crossed your mind. And, if you saw AI upscaling tools or 4K remaster offers on the internet, you might be asking: “Can my old tapes be made to look that good?”
Directly speaking, the answer is no, we cannot convert your VHS or analog tapes to real 4K quality videos.
It is not due to the technical abilities of our hardware or method but just the fact of the source materials. In the case of analog video formats such as VHS, 8mm, and Betamax, they were executed at a much lower resolution than those used for digital today. To give an example, VHS has a horizontal resolution of roughly 240-250 lines, whereas actual 4K has 3840 horizontal pixels. We believe we shouldn’t artificially invent the details that were not there originally with AI. The time may come in the future when the demand becomes overwhelming, but not now.
What we offer is the highest possible digital copy of the tapes that you have. We capture every bit of the quality that is there and do not do any kind of computer generated enhancement with our careful equipment upkeep, correct signal processing, and professional-grade capture methods.
In this article, we are revealing the transfer process that we go through to give you a clearer idea of what can be achieved from a tape transfer and how you can maximize the value of your tapes.
The Foundation: Clean Equipment Makes All the Difference
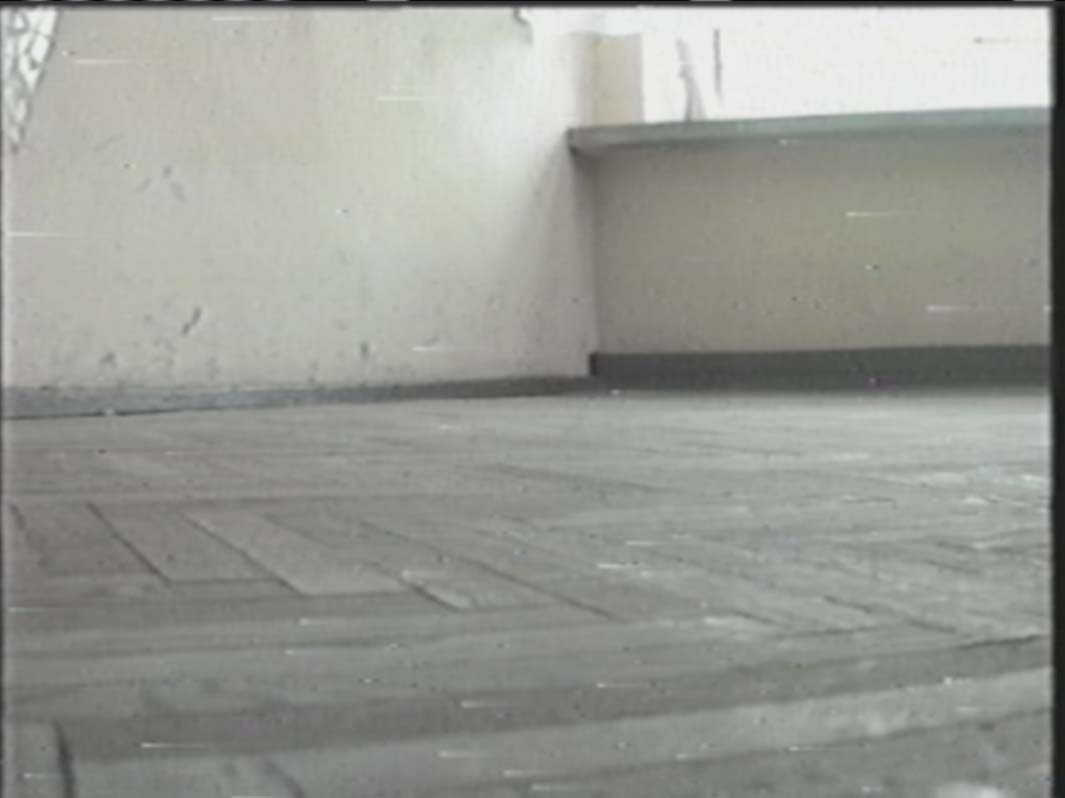
Before actually transferring your tapes, we feel the necessity to discuss an issue that might be considered boring but is absolutely important for quality: the cleaning of our playback heads. Video and audio heads are the parts in your deck that physically reads the magnetic information recorded on your tape. Though, there is the possibility that these heads after just a few tapes, it will accumulate residue including magnetic particles shed from tapes, dust, oils, and oxidation from older tapes. The contamination layer, even if it is very thin, creates a barrier between the head and the tape, thus resulting in dropouts, visual noise, muffled audio, loss of detail and clarity, tracking errors, and complete signal loss in the extreme case. See Figure 1.

It can be compared to trying to read a book through a dirty window. The words are still there, but you are not seeing them clearly. We clean our heads as a part of our work routine. We may even be cleaning the heads several times if we are working on tapes that are in bad condition. We also use gentle cleaning solutions, lint-free cloths and swabs for the process. See Figures 2 and 3. Clean heads mean that we get the cleanest possible signal from your tapes. It is a very tiny detail that has a huge impact on your resulting digital files.
Note that sometimes when you are recording your own material from Hi8 camcorder tapes, VHS-C and the alike, you may be recording with a dirty VCR head, and thus, the poor quality is “burned” into the video and cannot be removed. In this case, the poor quality came from the original transfer when it was being digitized from a camcorder tape to a VHS due to the dirty heads inside the VCR.

Pre-Transfer Inspection: Protecting Your Irreplaceable Memories
Once we receive your material, we do not put your tapes into a VCR or machine right away. The initial step is an inspection for which the importance is beyond what most people think. Tapes have a finite lifespan. Due to the fact that they are stored in attics, basements and storage units where temperature and humidity are not constant. The magnetic coating can get very brittle, the tape can become warped, and the plastic casing can get cracked or broken. Sometimes there might be mold on the tape surface and sometimes the tape can be stretched, crinkled, or even snapped due to the previous play attempts. See Figure 4.
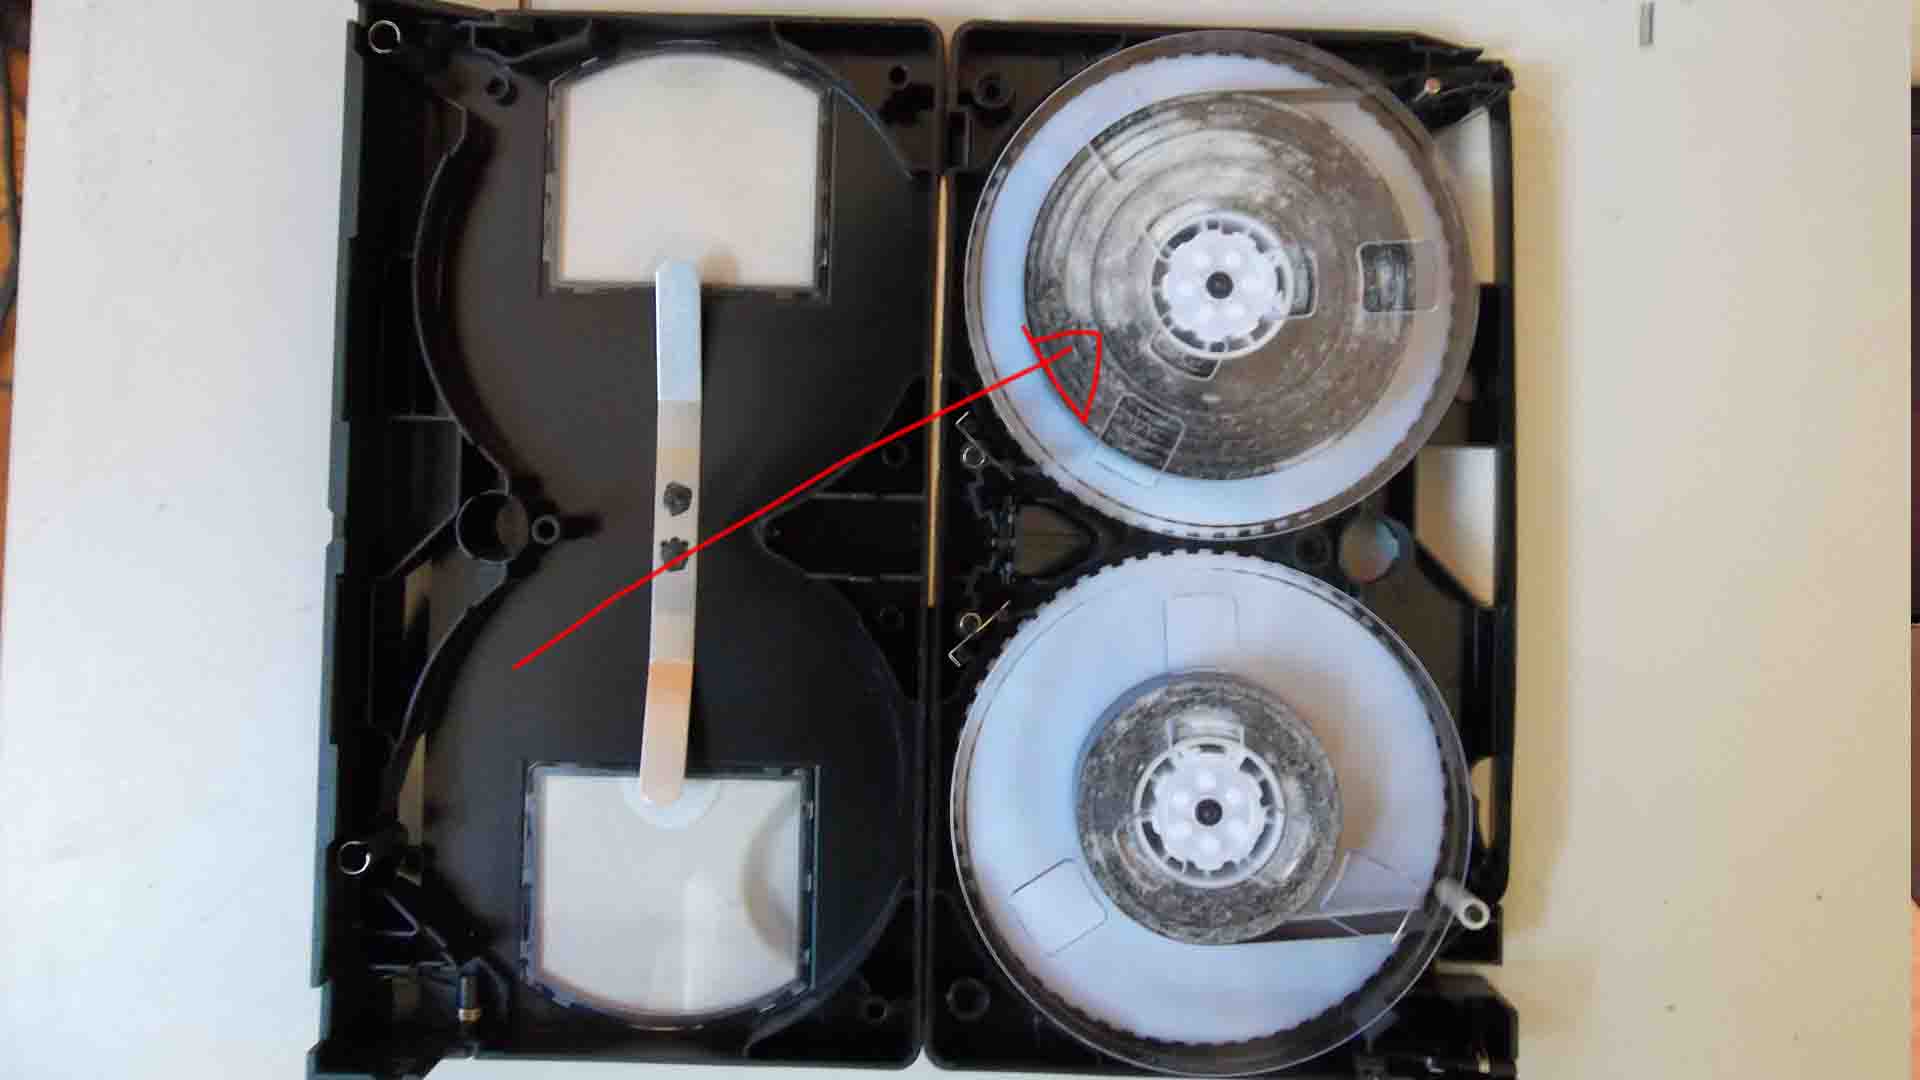
In the inspection of the housing, we look for broken or cracked cassette shells, missing or broken tape door mechanisms and damage to reels or hubs. We check the tapes for visible mold, sticky shed syndrome where the magnetic coating has deteriorated and becomes tacky, edge damage, and creases or wrinkles in the tape. We also refer to the issues of tape path whereby the tapes might be improperly wound, tangled, looped, or unattached from the reel. Time taken for the inspection might be what separates the successful transfers from the permanent losses of your footage.
Furthermore, one thing that we do differ from what you might expect is: just one full run is what we aim for in playing your tapes. Mechanical stress accompanies every time a tape is played, rewound, or fast-forwarded. The tape is being guided over several guides, rollers, and the video heads themselves, thus the friction and wear are inevitable. If the tapes are aged 20, 30, or even 40 years old, the mechanical stress should be minimized to the utmost extent. The transfers are done in one go from start to end. After the digitization, your tape is still in the best shape possible after the transfer.
The Technical Process: From Tape to Digital
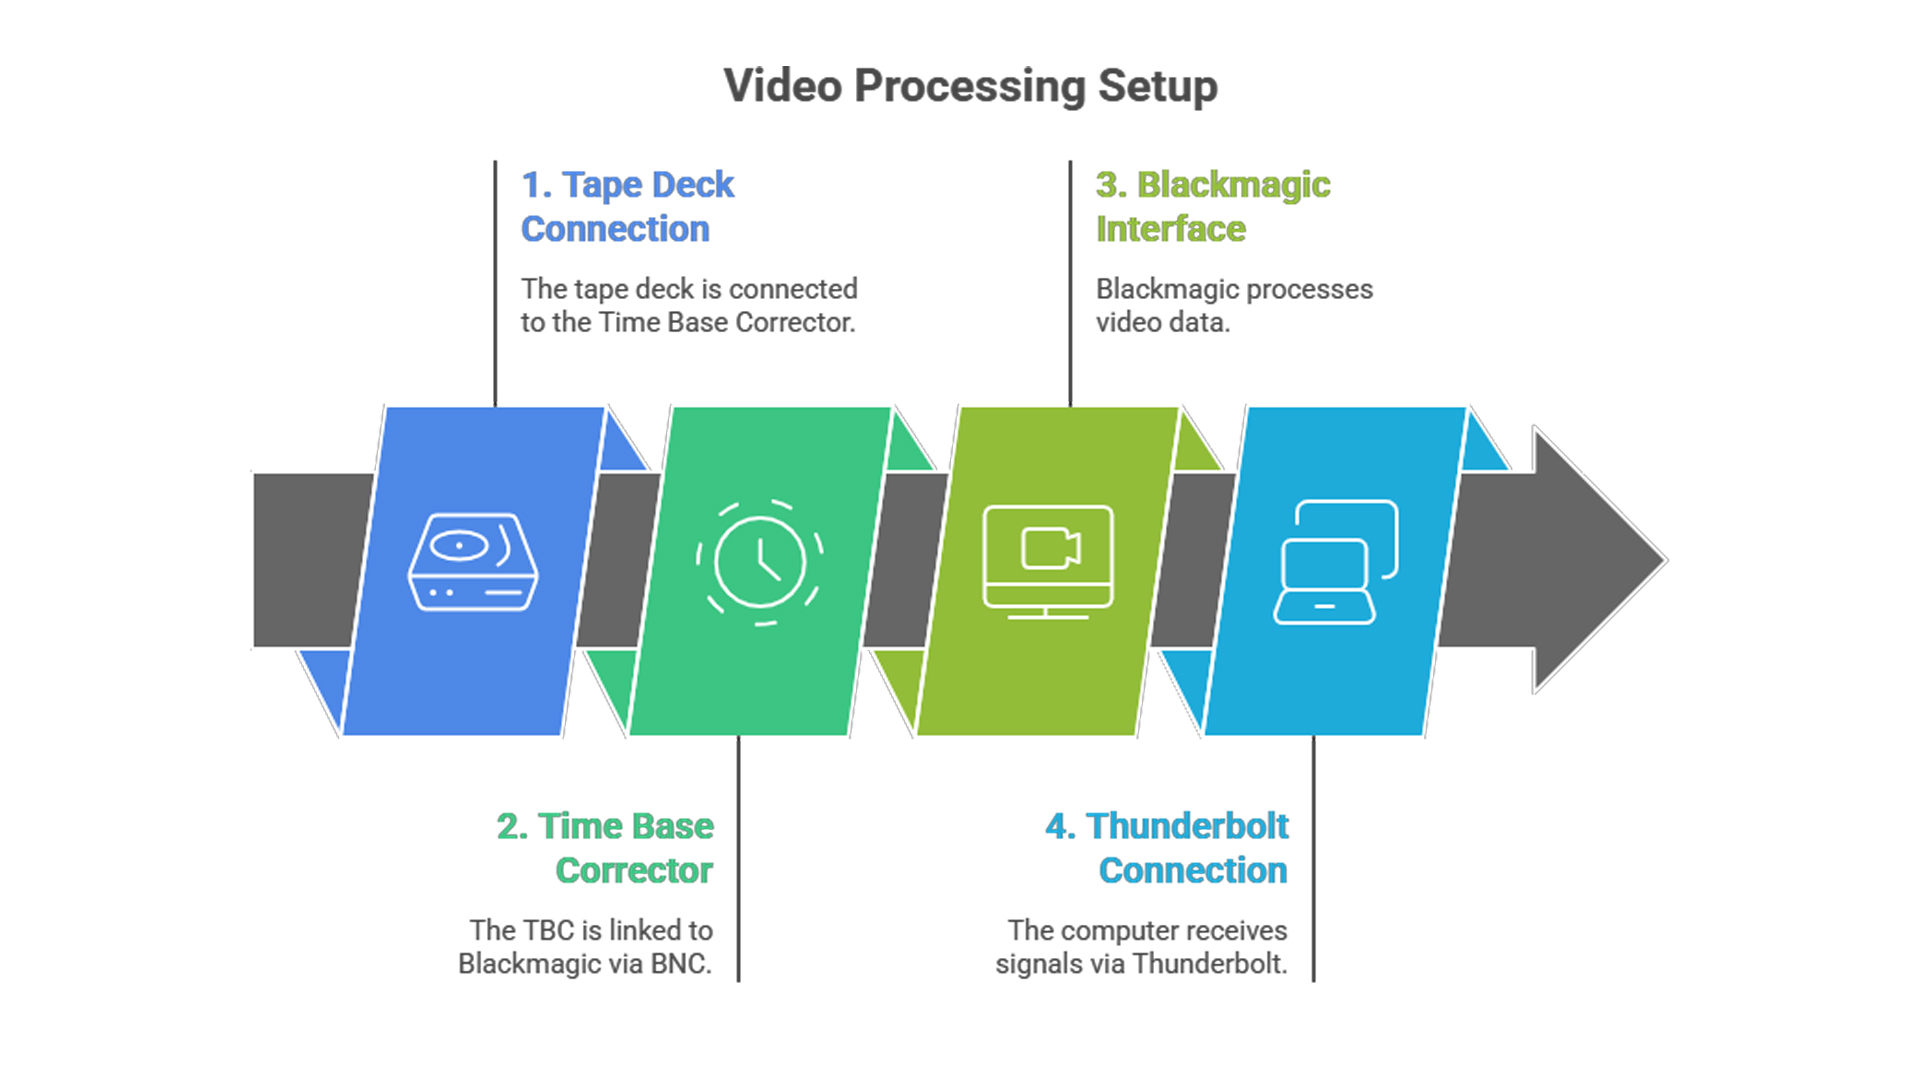
The path that your video takes from tape to a digital file is very specific: Tape deck or machine to Time Base Corrector to Blackmagic Hardware to Computer via Thunderbolt. Every part of this chain is there for a certain reason, and if you remove even one component, it would result in an undesirable result.
We transfer many tapes to digital files, each year we go through many decks and machines. These machines consists of various connectors such as RCA, BNC, Component, S-Video, 1394 Firewire, and SDI. In most analog instances, RCA is used. Prior to proceeding with our services, ensure that you are satisfied with our connector type. Please see the photos below to get a comparison between the RCA and S-Video. It is a screenshot taken directly from the Ben Jones’ comparison video. (Figure 6)
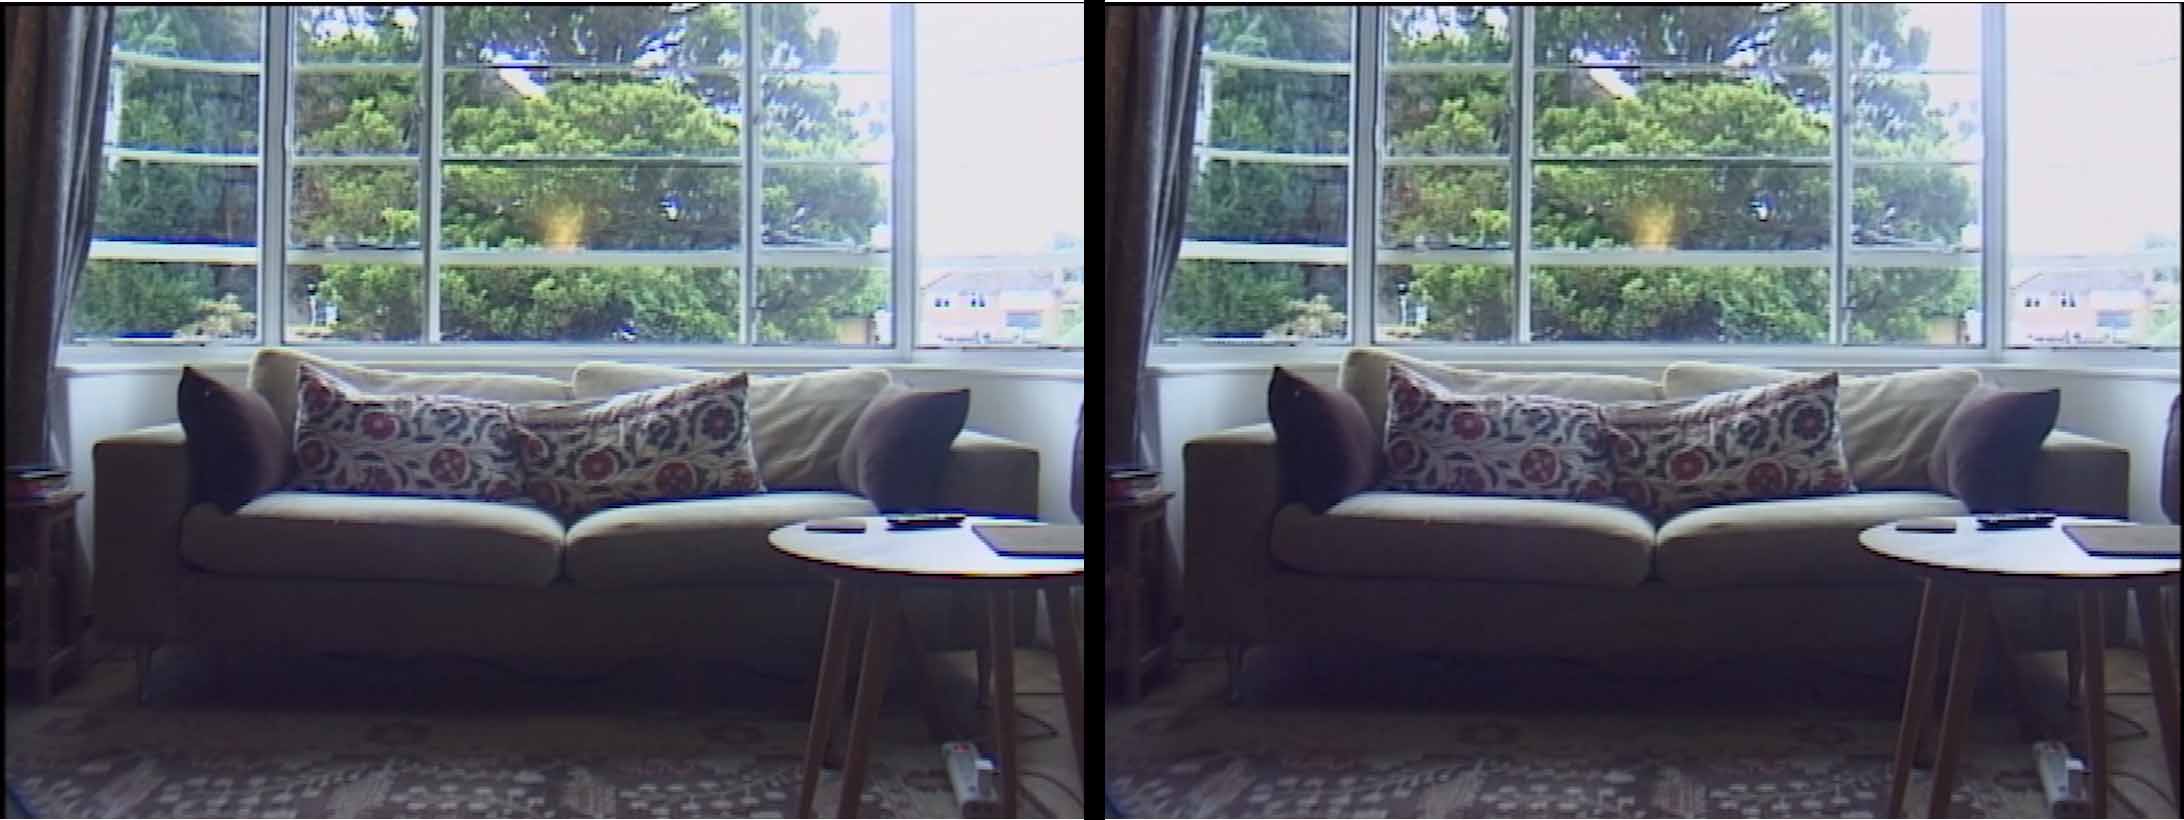
The photo on the left is S-Video, the photo on the right is RCA. However, it is arguable that the Time Base Corrector is the most valuable item in our chain of equipment and it is something that many budget transfer services do not have at all. A TBC takes a very unstable analog video signal and corrects its timing errors by reading the incoming video signal, storing each frame in a buffer, analyzing the timing information, and re-clocking and outputting the video with stable, consistent timing. New digital capture devices require a very clean and stable signal and without a TBC, the timing errors on the tape can cause dropped frames during capture, sync issues between the audio and video, glitches and artifacts in the digital file, as well as problems importing and editing the footage later.
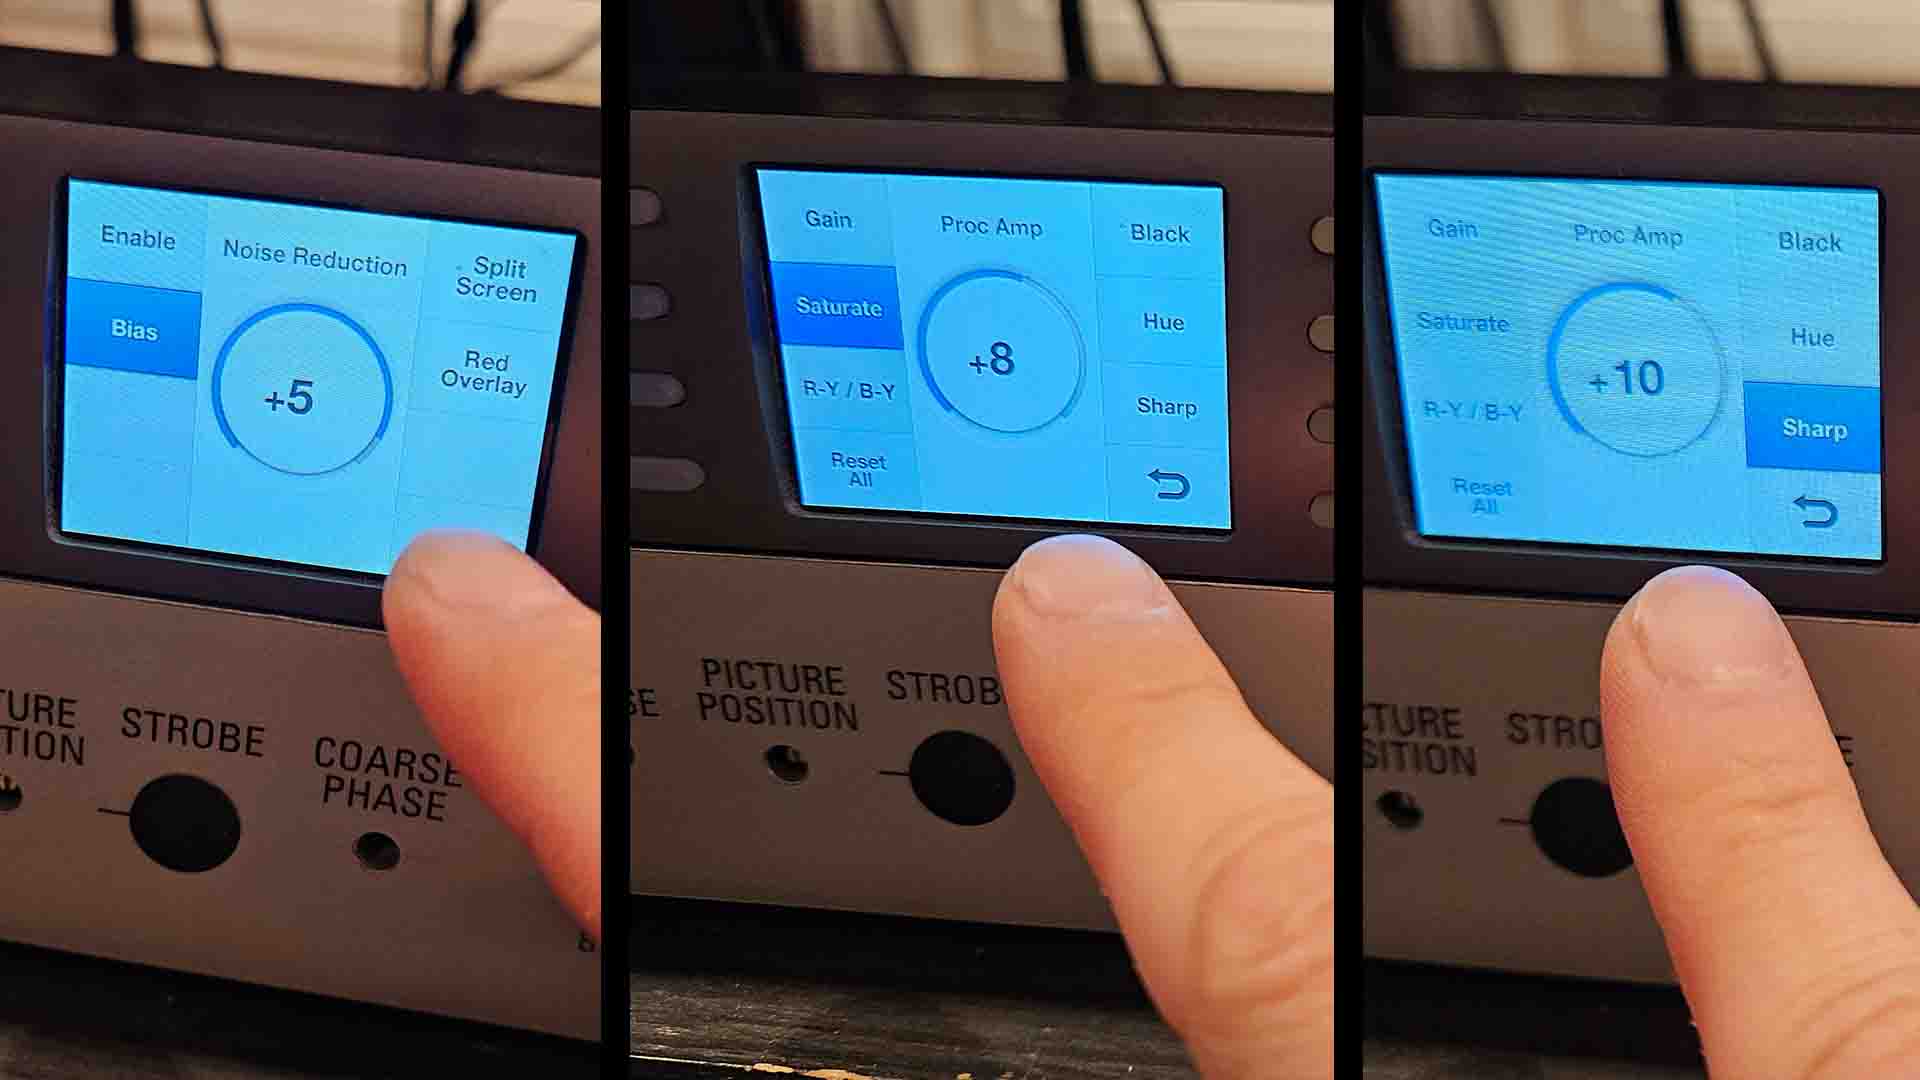
The TBC stabilizes the signal which is then sent to our Blackmagic capture hardware via BNC cables where we perform professional-grade noise reduction that purifies the image without killing the detail. Prior to the transfer, we take an average and we carefully set the colour saturation, sharpness, audio levels to make up for the signal loss and fading that may come from old tapes. We also apply a noise reduction filter to the transfer (See figure 7 for typical settings). We should also point out that analog-to-digital conversion is done using broadcasting converters that carry the signal from the analog format to digital with the least amount of degradation possible.
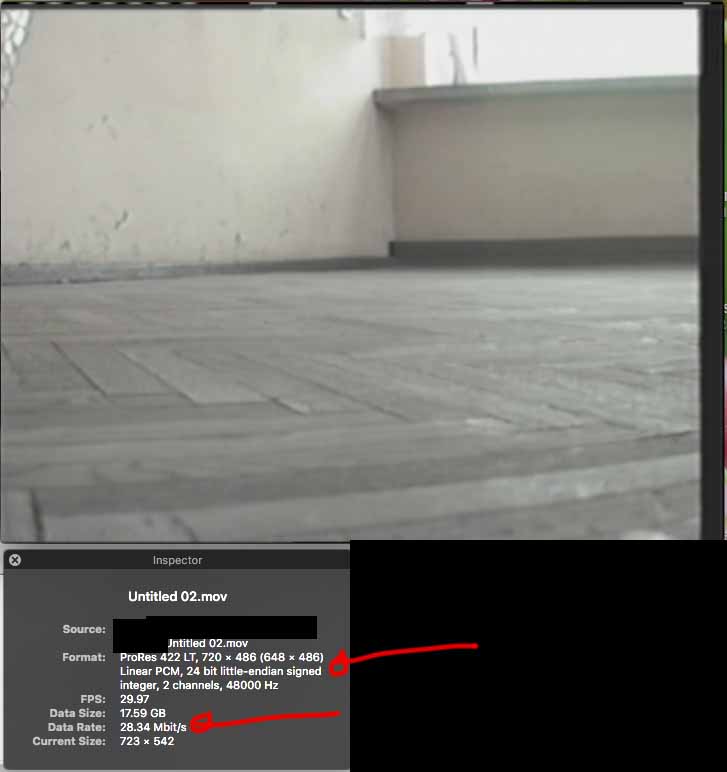
We do the raw capturing in Apple ProRes 422 LT in 720×480 at 29.97fps (See Figure 8) which has a bit rate of approximately 30 mbps. Analog video has an equivalent bit rate of less than 5 Mbps. By capturing at a much higher bit rate, ProRes files than that of the source, we are making sure that the process of digitization is not the one that is “throwing” in compression artifacts. We are saving all that the analog signal has without newly degrading it.
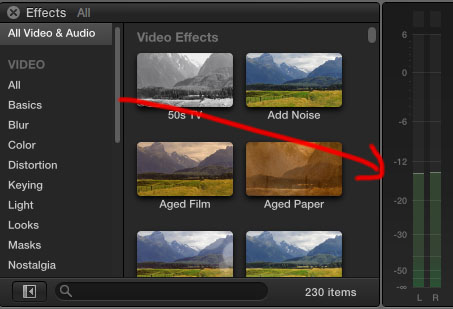
In regards to the audio, we set it to approximately -12dB as per our website specifications (See photo to the left/top). This will ensure the lowest probability of the sound being distorted from clipping (being too loud), at the same time giving room for the editor to increase the volume if needed later for post production considerations.
Once the capture is complete, we use Adobe to remove the excess where it contains no footage and export it to MP4 format at 5mbps as per website specifications. We then check the beginning, middle and the end of each file for any anomalies.
Understanding Why Your Transfer Looks “Flat”
This is the discussion we have with our clients more than once: “The transfer looks flat.” “There is no colour.” “It seems washed out.” We get the point, but here’s what you really need to know: it’s actually a sign of a good transfer, not a flaw.
Prior to each capture, we adjust the Luma and set the levels. Thus, our transfers are in a standard called Broadcast Safe format. Broadcast Safe is when the sound and visuals are technically compatible with specific ranges with what is expected by broadcasting stations. The colour levels, brightness and saturation of the content will look in a uniform way and not be distorted on screens where computer monitors have wider ranges. TV broadcast standard is about employing the same colour channels, brightness, and contrast, as well as limiting the signal (blacks at 0 IRE, whites at 100 IRE for NTSC/PAL) in order to avoid oversaturation and blown-out highlights which are the main culprits of footage that cannot be shown on the air.
Hence, when you look at our Broadcast Safe transfer and think that “this looks flat,” what you are really seeing is that the video is calibrated properly. That is what bars and tones are used for in a broadcasting station. See Figure 11.
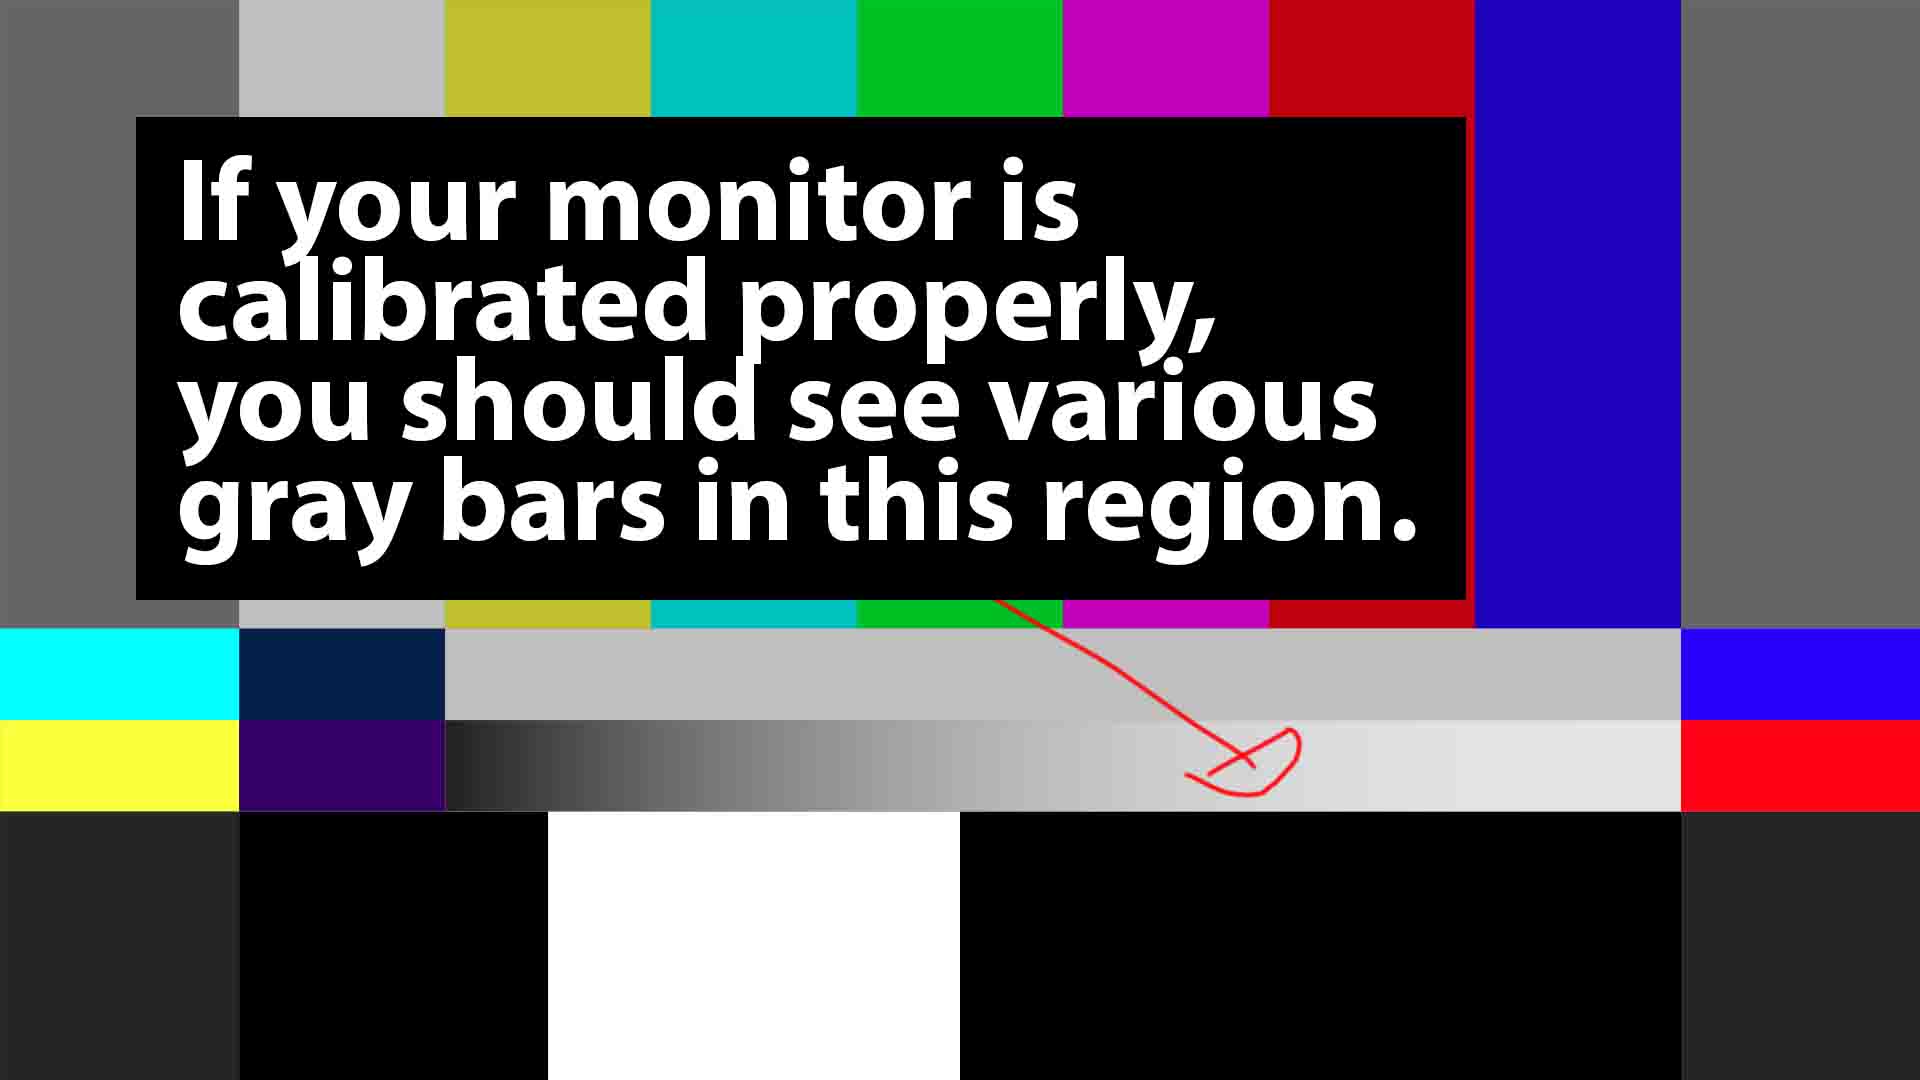
Bars and tones refer to a typical video or audio leader which has colour bars (used for video calibration) along with a certain audio tone (used for setting audio levels) at the beginning of a professional content. Each consumer TV screen has various brightness and contrast settings. For example your computer monitor has a different brightness setting compared to your TV screen. Therefore, bars and tones will ensure that there is a standard set in the broadcasting industry prior to distribution.
These are used to guarantee the correct playback, colour precision, brightness, and sound levels when checked on various devices and thus, they serve as a vital diagnostic reference which can be used by broadcasters, editors as well as post-production teams.
They are the ones that bring about consistency, thus, making it possible to match the brightness, the saturation of the video as well as the loudness of the audio to the broadcast standards before the actual program starts, hence, detecting the problems in the signal chain.
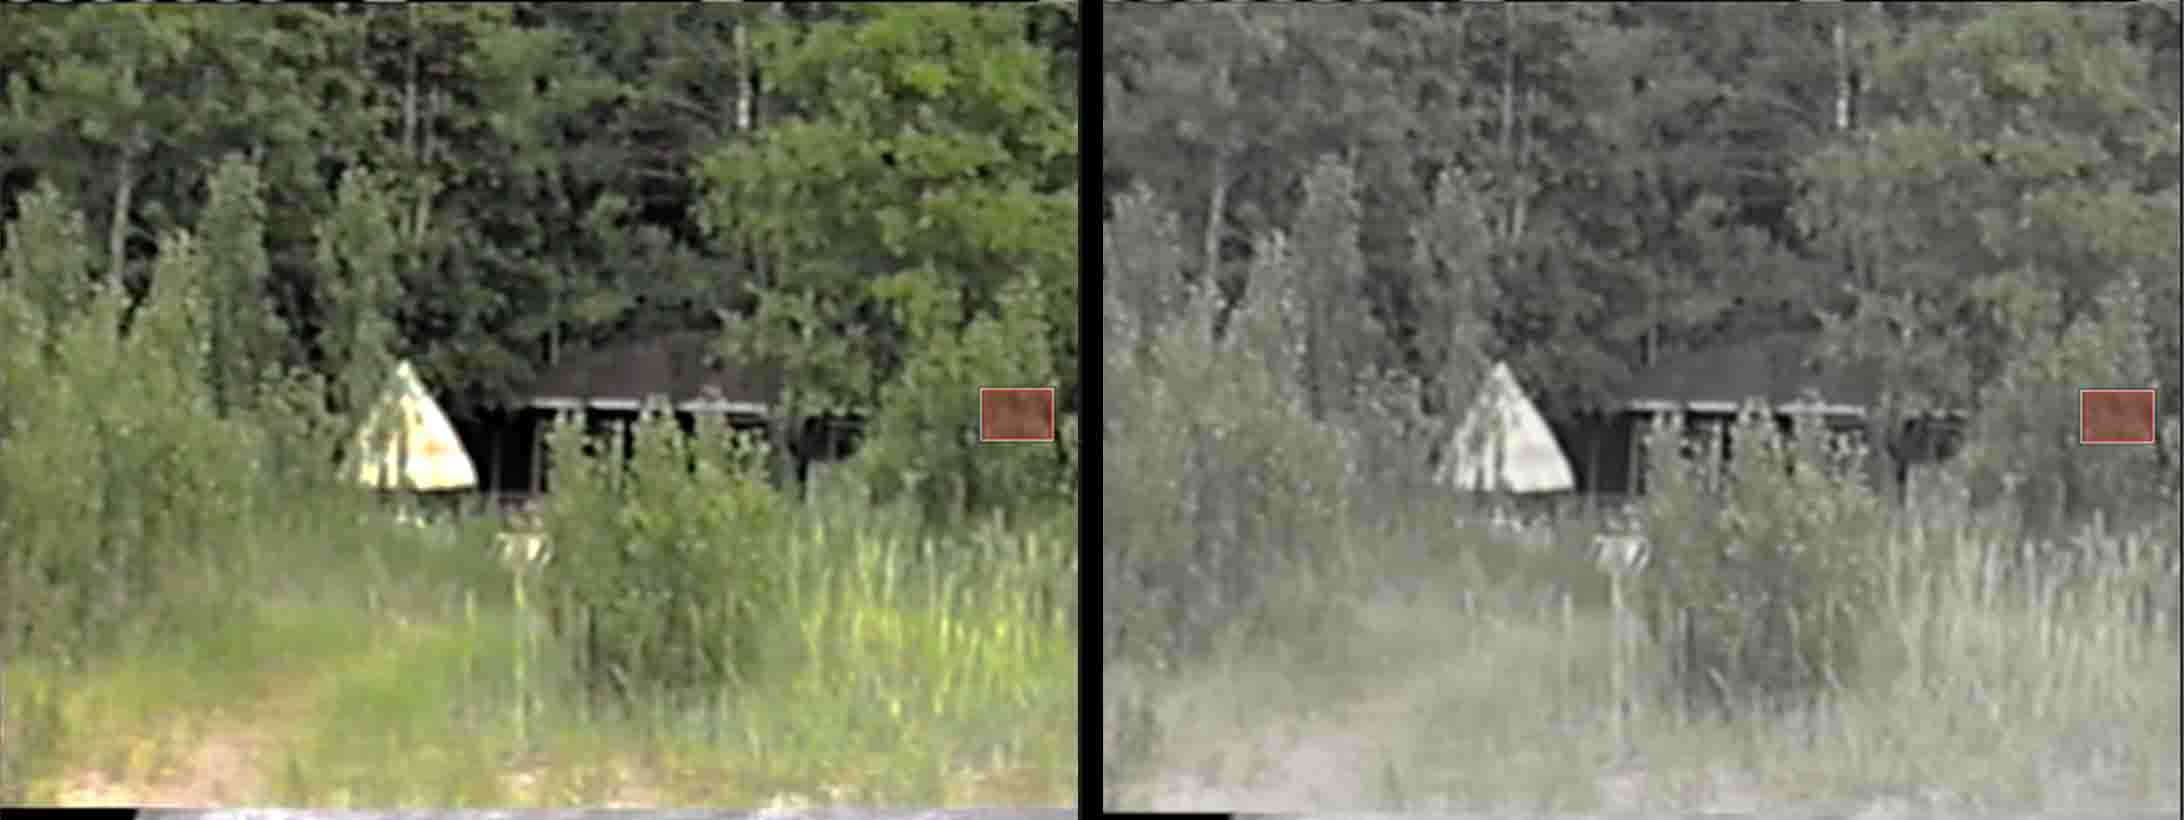
Our transfers is the closest possible representation of the original without colour and contrast being artificially enhanced. Our Broadcast Safe transfers are very much like LOG footage from professional cameras.
Log (Logarithmic) profiles record a flat, desaturated, high-dynamic-range image for complete colour grading control in post production, just like a digital negative. Whereas Rec.709 profile is the standard colour space for HD video, thus bright, contrasty, normal-looking footage can be obtained directly from the camera which is perfect for quick turnarounds but with limited flexibility. In otherwords, the difference between a LogOG and a Rec.709 colour space is a choice between a more flexible and a ready-to-use type of file.
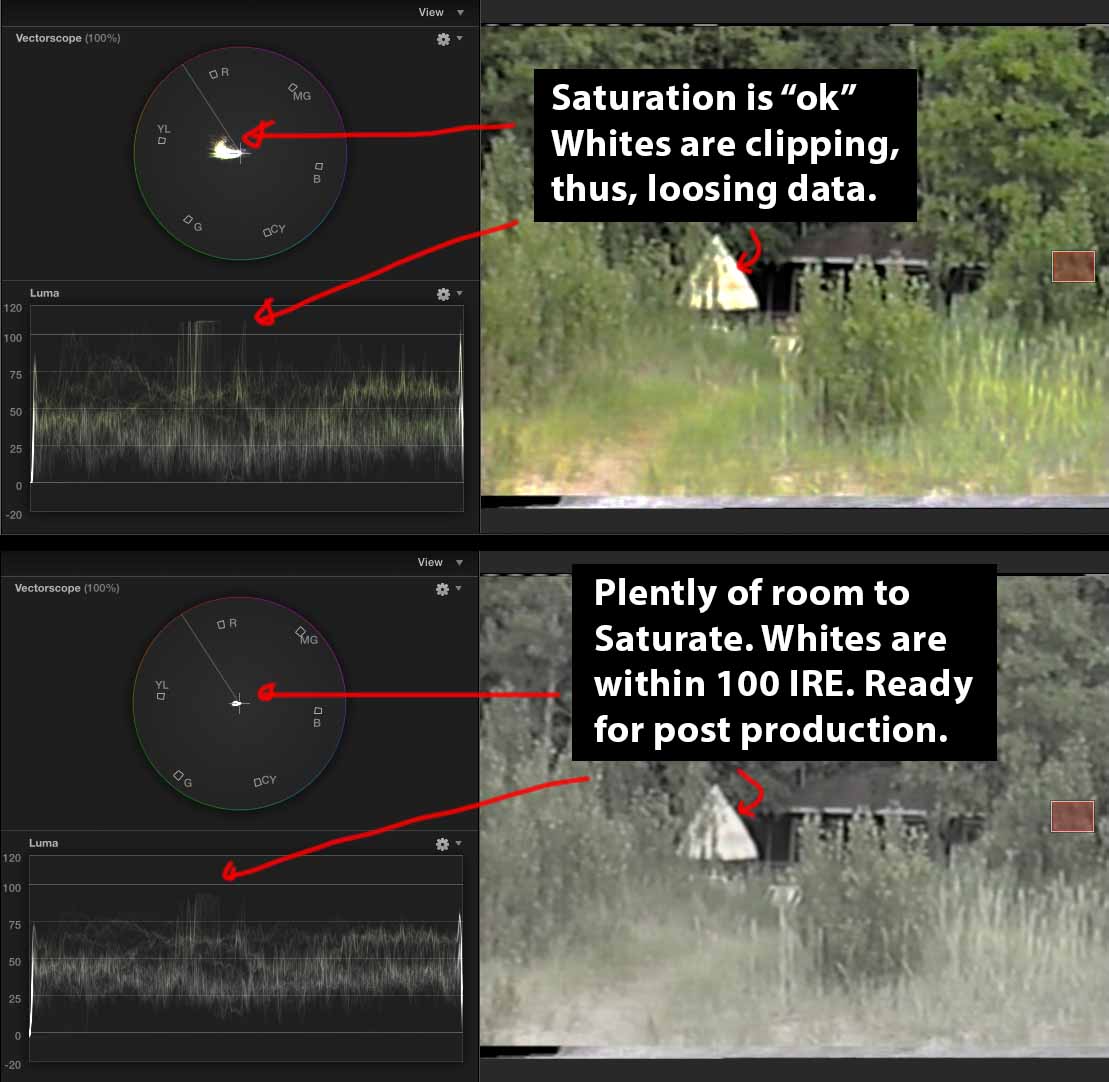
We, by default, provide all transfers in the LOG colour space, it will give you more dynamic range for future editing considerations. We are putting more emphasis on saving the information rather than the immediate visual impact, which means your transfer contains more information than is visible in the “flat” image. That information can be utilized for professional post production work. No data has been permanently crushed or clipped, and you have the maximum control of the final look.
However, if you want to have a more lively, watchable transfer kind of look, (in what we refer to as the REC709 colour space as per explanation above) then just inform us. We can definitely recreate your transfer in REC709 colour space. Just note that some data may be lost, but it is very attractive from the get-go with the contrast being boosted and the colour saturation being increased. It makes the video look “finished” right away.
Your Memories Deserve Professional Treatment
Our purpose of video transfer is not to make old tapes look like they were shot yesterday. The aim is to keep what was actually recorded—with all the flaws, all the quality levels typical of the period and its authentic character, so that the following generations can see these moments as close to the original as possible. When your grandchildren will be watching the footage of their great-grandparents in 50 years’ time, they won’t be disappointed that it’s not in 4K. They’ll be thankful that someone took the trouble to do it professionally in the first place so we know that the memories survived.
If you have tapes, which are hiding in a closet or a storage unit, do not wait. Magnetic tape will become worse with time. Each year you delay is another year of deterioration. The best time to transfer your tapes was 5 years ago. The second-best time is now. Are you prepared to keep your memories alive? Remember, memories can be lost, but film lasts forever.