
D.O.P Lucas Cheong & 2nd camera Jan Ian Chow from Toronto
Do you want to make your video look awesome? Well then, I have a technique that can help! We recently filmed a short promo video and have roughed in the edit with music and a voice over. At the moment we are working on the visual effects. Here’s an awesome tip I’m using that you can apply to almost any of your work to make your shots more dynamic. You can also make the shot look better if you plan the shots ahead of time for the effect.
The secret is simple, replace all or portions of the background of your video. This technique is used in many mainstream films today and can greatly increase the value of your production.
Avengers, 2015. Directed by Joss Whedon
It doesn’t necessarily have to be filmed on a green screen as seen in the image on the left from Avengers. But the screen will definitely help make the removal of the background easier; because green is the colour that is furthest away from skin tone. Therefore the computer can isolate the green easier.
In our promo video starring Deanne Wilder, all of the shots we planned were actually not intended to be set up for visual effects except for a few minor ones. That is why we didn’t film this project in front of a green screen. So separating the subject from the background will require loads of work. Luckily, After Effects CC by Adobe has a great tool to separate the background from the subject. They have also added a very important feature which will allow the roto-artist to fine tune the edge of a subject in more detail than the previous versions of After Effects. This is truly a game changer.
The software uses contrast in the frames to separate the subject from the background. (If you want to learn more, check out this video for the history of chroma keying!) When you select a region that you want rotoscoped (a technique in which a visual effect artist cuts out the subject from the background almost frame by frame), After Effects runs through a series of complex algorithms to make the roto work semi automatic. I’ve noticed that if the shots don’t have much contrast, After Effects finds it difficult to pick out the edge of the subject you’re trying to roto out. In general, this tool really does save a lot of time. Check out the before and after clip below where I’ve used this new feature and replaced the entire background to make the shot pop.
The waking up to a beautiful morning shot.
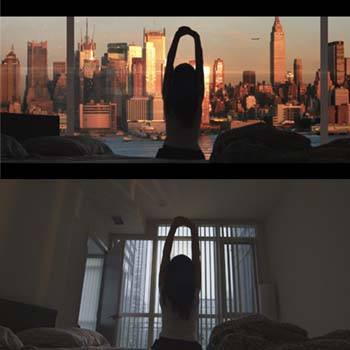
In this shot, we filmed in a very small room in a condo with a 14mm prime lens. It’s a wide angle lens in which you can still get shots without seeing the fisheye effect. This shot was intended to replace the city skyline that is outside the window, but not the interior walls. However, we can add more to it by replacing the entire background and keeping only the bed and the subject. The problem for separating this was that there was not enough contrast in the lighting between the background and the subject. After Effects ran into many problems trying to do the roto work automatically. I had to split the work into several small sections known as masks (a cut out made for that specific part of the body) and go manual.
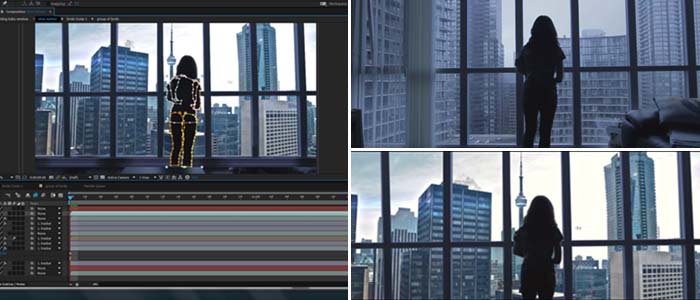
First, I used the auto roto tool from After Effects to cut out her hair. I had to pause and adjust this many times in order to get the rotoscoping done right. I then applied the edge refine tool onto the layer with the subject to soften the edges and make it look more natural. I then went almost frame by frame to cut out the rest of her body and the bed. Each of the limbs you see in this shot had a separate mask. I’ve split it into forearm, upper arm and body. Once the subject was separated, I created several masks for the bed as well; one for the headboard, pillow and blankets. There were about 350 key frames! After the entire foreground was separated from the background, it was now time to create the window.
Our gaffer adjusts the light which sits outside in front of our actress to act as sunlight reflecting off the buildings for the visual effect shot.
I created this custom window in Photoshop. I looked at real pictures for reference, and tried to mimic natural shapes for the shadows and lighting by manipulating the solids in Photoshop to match it. Then it was composited into the final shot. I found a picture of the skyline on Google using the “labelled for reuse” search tool so that it only searched for open source material. I then added, digital noise to match the existing video, animated an airplane in the distance, added dirt to the glass in the window, and of course, the lens flare as you can’t go without that extra touch! All these elements helped make the shot look more believable. The entire clip was then tracked so that all the elements would lock onto the footage as the camera was hand held.
So there you have it. A short behind the scenes description on how these shots are achieved. I hope this gave you a basic insight on how more complex shots are created in a motion picture. So the next time you sit in a theatre, think about how many hours a team of visual effects artists has spent to create a shot just to help tell a story in order to entertain you! If your project requires any visual effects shots, please feel free to contact us as we’d like to help answer any technical questions that you may have! And like always, happy editing!
Photographs by Alex Chiu