
Happy holidays! Wouldn’t it be nice to put together a cool 3d parallax photo slideshow like the video you just saw?
First, I want to give a shout out to make up & hair Valentina Dang, Donna Szeto, actress Lindsay Ogus, audio Andy Wong, 2nd camera Vi, location Ray, gaffer Cuong Phan and PA Nicky Kowsari. Also Lucas Cheong, Matthew Windsor, Jeff Yung, Scott Wilson, Henry Wong, Kevin Yu, Jia Feng, Teva Fourier, Jan Ian Chow and my wife Yue Dan. They took part in the project above and were truly amazing. Be sure to check out their links!

We also need your help, we’re looking for people to join our Launch Group. Check us out for more information and a chance to win cool prizes!
Without any further ado, I’ll explain how to make this awesome slideshow!
This slideshow video is an intermediate level tutorial. I will mainly be going through an overview. You need to be familiar with a video editing software like Adobe Premiere or Final Cut, there is also a free software by Black Magic, DaVinci Resolve. Here I use Sony Vegas. Also, you need to understand Adobe After Effects, and Adobe Photoshop. The concept behind the slideshow is very simple. You are basically separating different parts of the photo into background, mid ground, and foreground sections in Photoshop. Once they’re separated, load them into After Effects, and place them in 3D space, add a camera and animate it.
Step #1 – Finding “The One”
First you need to find a series of good photos. In a normal slideshow, I normally set the length of each picture to 4 seconds. However, this is a special scenario because the camera is animating and takes longer to review the final picture. I set my images to 7 seconds each. You also need to find a good picture. You need to have depth in your photo and separation between the background and the foreground. This will make your animation pop as the camera moves from near to far and reviews the objects.
[one-half]
[/one-half][one-half last=”true”]
Fig 2. The pen tool, and “spot healing brush” tool was used to crop Jia Feng out from the background.
[/one-half]
Once your images are loaded up, place the pictures onto the timeline to get a sense of how the animation will look. You can place a temporary music track to help visualize the slideshow. Once you are satisfied with the selected pictures, it’s time to edit them. (Fig. 1)
Step #2 – The Cutout
Open Adobe Photoshop and load the picture. The first thing you need to separate is the foreground objects and people from the background. You can use the “magnetic selection tool” or the “pen tool” to extract the foreground objects. Once you have highlighted your objects, paste them onto a new layer. Continue to remove foreground objects and paste them onto new layers until they are all complete. Do this until you have separated the mid ground and foreground objects.(Fig 2.)
Fig 3. Patch up work does not have to be perfect, just needs to spill in a bit to cover parts of the hole. Adjust accordingly after visualizing it in After Effects.
The next step will be the most time consuming as you need to fill in the holes of the background image from where you’ve cut out your foreground objects. You can use several tools such as “clone tool” and “spot healing brush tool”. In the newer version of Photoshop there is also the “content aware tool” that you can use. That tool duplicates the image’s pixels and works well on patterns. You can access this by going to menu, edit, and fill. Get creative with this part! Each picture will force you try a different way to patch up the holes. You can also try using the “lasso tool” to isolate an area and apply “content aware” onto it to see how well it patches up. Then you may have to go back in to the photo using the “clone tool” to touch things up. Another method you might want to try is using the “spot healing brush” tool, it uses “content aware” to sample the pixels around the selection to create a pattern to fill the hole. (Fig 3.)
The good thing is that it’s not mandatory to patch it up with 100% accuracy as the foreground item will cover the majority of the patched background image. Make sure you have labelled your layers in Photoshop and keep them organized. Save the project as PSD.
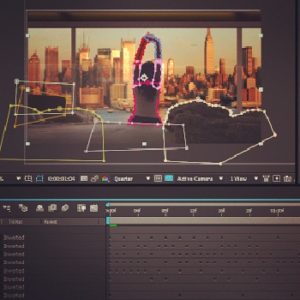
Step #3 – After Effects
Now that you have your footage separated in Adobe Photoshop, it is time to load them into After Effects. Set your composition settings so that the length is 7 seconds. Make sure that when you load the PSD file, you load them as separate editable files. Once it’s in the project bin, drag all the layers onto the timeline. Next make all the layers 3D and add the 35mm camera into the timeline. While in the “top view” mode, move the background image all the way back using the “z” axis and then select “active camera” view so that you can scale the image up until it fits the preview window. Then do the same with the mid ground and foreground images. The mid ground will be in front of the background and the foreground image will be in front of your mid ground image in 3D space (Fig 4.).
[one-half]
Fig 4. In After Effects a 3D space was created and a digital camera was placed into the space. You are viewing the “top” view of the animation.
[/one-half][one-half last=”true”]
Fig 5. Optical Flare plugin can be used in enhance your shot.
[/one-half]
To create the animation go to the “active camera” view while the camera is selected. Put the cursor to the start and zoom in until you get the angle you like using the “z” axis. This will set a key frame on the zoom, then go to the end of the clip. Zoom out on the camera’s “z” axis to a desirable angle and this will automatically set a key frame on that position (Fig 4).
Next add a blur effect on the foreground image to create a shallow depth of field look. You may need to fix some of the images back in Photoshop if the background image was not patched well from part 2. You can also try to add a flickering lens flare effect, if adding one makes the shot more dynamic (Fig 5). A good one is from a plugin I used by Andrew Kramer, Optical Flares (note I’m not affiliated with them).
Fig 6. Puppet tool helps animate subtle movements to the pictureFinal Touches
Use the puppet tool which is available in the more recent versions of After Effects to animate the mid and foreground layers (Fig 6). Play around with them as these movements look better if they are subtle. Add movement by bringing the cursor to the front of the clip to automatically set a key frame. Then move the cursor to the end, animate the layer, and the key frame will be set automatically.
Once you are satisfied with the look, add some noise to the final footage and export the file. Drop the picture into the video editing timeline and repeat the above as needed. I normally make my slideshows no longer than 2 minutes in total when going online as people tend to loose interest quickly now a days.
If the above sounds a bit too complicated, feel free to contact me and I can walk you through the process. It truly is an awesome effect and can blow everyone away this holiday season. I hope you’ve enjoyed the article, a safe and wonderful winter break to you and your family. And like always, happy editing!