
I’m really excited to be releasing our new promotional video; it will be up on our video production page. We’ve been working on this project for several months now and I couldn’t have done it without the amazing help from Deanne Wilder, our folks at Reel Deal Guys with their award winning voiceovers, the beautiful make up by Milan Seki, D.O.Ps Lucas Cheong, Jan Ian Chow. Our Gaffer Cuong Phan and our photographer Alex Chiu. Also thanks to Karla, Raymond as set coordinator, Tiffany for her cooperation at Rubberball Productions. And finally my wife Yue Dan & my son Nathan. Be sure to check out their links!
Spoiler alert! For filmmakers that are interested in learning more about this project and to see more of our world, keep on reading as I expose three basic tips in filmmaking! Otherwise check out our promo below!
1) From Mind to Vision
Director of Photography Lucas Cheong from Toronto.
Before a script is even written, it’s good to think about who your potential audience will be, that way it will be easier to “market” your film towards that niche.
A lot of companies today have ads showing their customers having fond memories while experiencing their service or product. For the McDonalds ads, they don’t show what kind of cooking equipment they use or how their meats are being handled; they show how people are experiencing a great time in their restaurants as seen in this recent ad. Sports Chek is also linking short stories of people training in their commercials by showing athletes wearing their products. They don’t show the factories and where there cloths come from.
For our project we didn’t want to show the equipment and technology we used to create our work. Instead, we thought about our clients and where we want to position ourselves in this industry. We decided to show our capabilities by creating a video with a story that most can relate to; it shows the audience our style and the meticulous preparation that goes into making each video.
Once you have decided on your niche and locked off an idea, script or outline. It’s time to film like crazy!
2) The 1 to 90 Ratio
An office shot was manipulated in post to create a never intended speech shot.
I once heard that documentaries’ ratio was 1:20 (for every 20 minutes of footage you film, you’ll be using 1 minute of it in the final edit). In our project, we had two cameras which had about 90 minutes of raw footage and our final edit was only 1 minute! The more coverage you get, the more flexibility you have in post for choosing the best shots possible.
For example, during production of the waking up scene, we had camera A on a wide shot, and camera B on a close up. Once those were shot, we grabbed insert shots and b-roll, to make sure we had all the angles of the scene . Then during editing, we actually only ended up using 1 shot from it, and manipulated with visual effects to add more value to the production.
If directed well, 2 cameras can also help save some time during production, because you can essentially be filming two shots at once. For example, if camera A is on actor 1, then camera B can be filming actor 2. Similarly, if camera A is a medium shot, then camera B can be a close up.
Having lots of extra footage may also make your production run smoother. During the post production phases, sometimes your idea evolves as you’re editing your work; you may need extra shots that you never anticipated. However if you can find a take which you can use, you can save time and money by not having to re-book the talent, the location and re-shoot.
In our case, Deanne’s character was suppose to be talking via webcam in front of a computer monitor in the office. However, after seeing how the entire piece was put together, it had more impact for her character to speak in front of an audience. So in visual effects, we masked her out and placed her onto a stage.
3) The Awesomeness with Visual Effects
If you have read my other articles, you will have learned a few tips on how to increase the value of your production without a Hollywood budget. One of the best tool mentioned in those articles is visual effects. Not only can it create the shots you want, but it is becoming easier for a novice to learn them, and the results are looking more realistic. There are plenty of free tutorials on Youtube and online like the ones by Andrew Kramer.
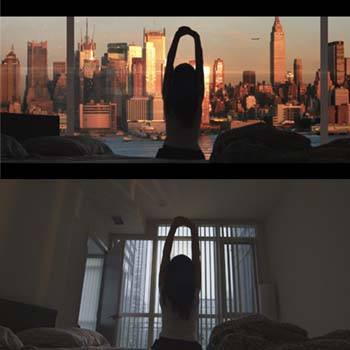
In our promo video, 25% of the shots were enhanced by visual effects. As you can see in the before and after example on the left. Deanne was painstakingly “rotoed” out of the background and it was replaced with an awesome skyline. Obviously we saved some money as we didn’t have to travel down to New York City to get the shot! You can read more about how we achieved this shot here.
Another way to save money in a production is to cheat your set for more than one location. In our project, the condo was used for 4 different locations! Visual effects helped turned some of the scenes into a different set entirely.
Some film critics say that visual effects in movies today are overdone and we need to go back to the times where filmmaking was more pure. But, that time never really existed. Since the early days, filmmakers have always pushed the envelope of technology by trying to create the impossible possible. At the end, all that matters is what is on that screen. Visual effects is simply a tool to help tell a story.
A lot of effort from a lot of people contributed to this video, and we hope it speaks to you and your story! Be sure to follow us on Twitter, Instagram & Facebook so that you can stay tuned for the “behind the scenes video” coming out next week. If you have any questions about our productions please feel free to contact us and like always, happy editing. Enjoy!